FREE STANDARD SHIPPING FOR ORDERS OVER 99€!
FREE STANDARD SHIPPING FOR ORDERS OVER 99€!
Glues & Liquids
Eyelash Extensions
ACCESSORIES
So Henna

Angel Lashes - A New Wispy Lash Trend
юни 28, 2023 3 min read
Get To Know Everything About Angel Lashes
The variations of Wispy Lashes just keep coming, and this trend is far from reaching its peak. Needless to say, a wispy lash design has never been more popular with clients than it is currently. We see wispy lash extensions trending daily and while that is a great thing, it can be easy to miss new and upcoming trends. So, let us introduce you to Angel Lashes.

What are Angel Lashes?
Like wispy lashes, Angel Lashes can be incorporated into any main lash mapping style your client desires, the actual technique of achieving the wispy lash effect is to turn 2D fans into spikes. You may remember reading our article on the Wet Look Lashes, there you’ll remember that the Wet Look technique required 3-5D fans turned into spikes. The process for Angel Lashes is similar, but we’re looking for a light and natural wispy and spiky texture, so we recommend Volume Mayfair 0.07 2D fans to help you reach the desired effect. For clients with more sparse lashes you can include some more open fans to close the gaps and really accentuate the texture from the lash spikes, here you can use a maximum Mega Volume Mayfair 0.05 3D volume fans, they will keep the lash look light and yet close up the sparseness of your client’s lash line.
How to Map An Angel Lash Set
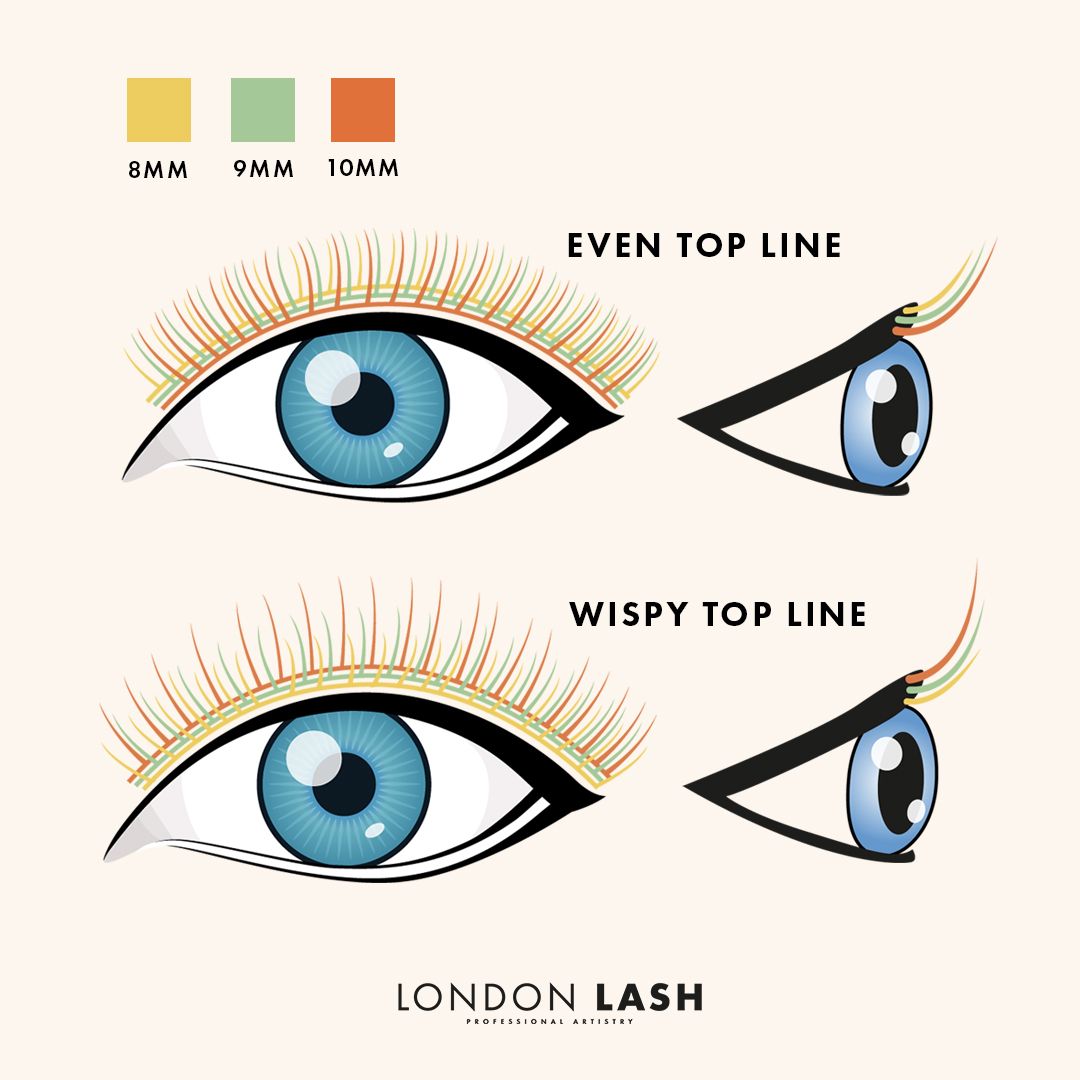
Following your chosen lash mapping style that you and your client have agreed on based on which will suit them best, begin to build up the Angel Lashes by creating a wispy and uneven top line. This may be going against your usual techniques and principles as an even top line is usually what we strive for, so let’s discuss how we can achieve this and still keep the look neat and tidy.

It comes down to application. The perfect Angel Lash set – and any wispy lash set, for that matter – is created in the opposite way to creating an even top line. For an even top line you’d drop one millimetre each time you go up a layer, for example; Bottom Layer - 10 mm, Middle Layer - 9 mm, Top Layer - 8 mm. For a really wispy Angel Lash line you need to reverse this. Bottom Layer - 8 mm, Middle Layer - 9 mm, Top Layer - 10 mm. The length is completely up to you and will depend on your lash mapping style, but the principle should be followed, as this will give you a really dense and textured bottom section with a light and wispy top line.

Techniques and Tools
To create the spiky closed fans with your volume lash extensions necessary for an Angel Lash set, you need to use lashes that are light enough so they do not damage the client’s natural lashes. The process for creating spikes is similar to the way you would do so for the Wet Look Lashes, but as you’re using 2D lash fans, the spikes will be naturally lighter. We suggest you use 0.07 lash extensions at most to keep your set looking lovely and light – the thinner the lash fibre, the lighter your set so also consider 0.05 lashes for your closed 2D fans for a very light and wispy look. Which lashes you choose will be based on preference, we recommend you consider Mayfair Lashes which have a shinier finish and appear darker and bolder, whereas Chelsea Lashes have a semi-matte finish, so create a slightly more natural lash look.
Now let’s talk about the process of creating your wispy spikes. Take a Micro Fibre Brush and apply a little Primer to it, dabbing any excess on a napkin. Brush through the tops of your lash extensions on the lash strip, this will keep the tips together, creating the closed fans (spikes) we’re looking for.
Be careful to only apply Primer to the tips of the lashes when doing this, if you over saturate the lash strip all the way to the base, it will affect the drying time when you dip the spike in lash glue, which could lead to retention issues.

Lastly, for a super ethereal and angelic look, why not use a few Coloured Lashes to create spikes? Adding a touch of Light Blue or Silver coloured spikes to the outer corners of the lash set will give a very subtle yet angelic effect. While coloured lashes may not be for everyone, remember you’re using 2D lash fans for your spikes, so it will not overpower the look, in fact it will open up the outer corners and bring attention to the eyes in the best way.
Subscribe
Sign up to get the latest on sales, new releases and more …


